


Of all the plants I grow at my allotment, those I most look forward to growing are giant pumpkins. I can’t say they’re high up on our list of ‘most eaten’ home-grown vegetables, that honour falls to potatoes, sweetcorn, onions, swedes, leeks and runner beans. However, unlike those other veg which are pretty easy to sow and forget about, most squash and pumpkins need regular nurturing and none more so than Atlantic Giants.
In the summer months my giant pumpkins become like my pets, I worry about them at night, I water them, I water them some more, they get daily attention, liquid manure feeds, their flowers get hand pollinated and the vines get ‘managed’. It’s ironic that giant pumpkins do, in my experience, offer little in taste – but I don’t grow them for anything more than the size challenge – how big will they get? Can I get them to grow bigger? Will they be the biggest in the Dorking squash and pumpkin show?!
Of course if you become an expert in growing giant pumpkins then all the techniques are completely transferable to other squash and pumpkins and they’ll grow better as a result. Think of a giant pumpkin as your pumpkin skills improvement project. At my allotment I don’t only grow Atlantic Giant pumpkins, I also grow Butternut Squashes, Turks Turbans, Rouge Vif D’Etampes, American Tondo, Black Futsu and a few other pumpkins for eating and entry into the Autumn show… but the giants are the ones I obsess over…
[hr gap=”10″]When and how to sow Atlantic Giants
 Get a good Atlantic Giant seed (you can source good seeds online) and then sow the seed on its edge just below the surface of a small pot of compost inside a warm greenhouse. It takes around 3 weeks to be large enough to plant out at your allotment and you may need to pot it on in the interim. Beyond 3-4 weeks it will start to take over the greenhouse! I’d recommend initially sowing in a greenhouse or on a windowsill three weeks before the final frost of the year (usually after the Grand National in the UK). Then plant out in mid May with a careful eye on the weather forecast for late frosts. In 2016 I got a little ahead of myself, planted out my pumpkins in early May and then got stung by a frost on Eurovision night (I’ll never forget it!).
My plants are always covered in plastic grow-tunnels at the outset (to give them a temperature boost) but they did still get a little burned by that frost in 2017 and if you look carefully at the second photograph below you can see some yellowing of the leaves. The frost didn’t kill the plants but it didn’t help their health or giant pumpkin prospects. There’s really no rush to get squash in early unless you’re aiming for a 1000lbs Malvern show entry, you only take a frost risk and the outcome isn’t typically better than waiting a couple of weeks. You’ll need around 120 days to get a good pumpkin fruit to size so you could be sowing out up until early July and still get fruit for Halloween season come late October.
[hr gap=”10″]
When and how to plant out
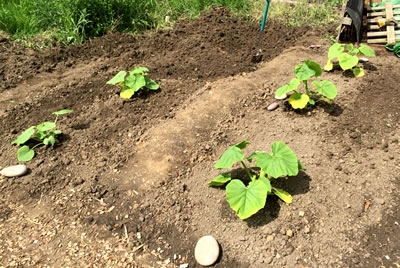 Giant pumpkins do take up a large amount of space over the summer months. DO NOT underestimate how far they will spread but that said, I do like to plant in rows of three with a view to losing the weakest plant after a month. Choose a spot that receives a lot of sunlight and if possible is also sheltered from the wind (I find a pallet compost bin provides some protection). Dig a large hole, fill with two entire 50l bags of compost (Jack’s Magic is my choice) add a large amount of well rotted horse manure or zoo poo, mix together and try to ensure you create a small dip to plant into (not a mound which will dry out). I usually add some mycorrhizal fungi root growth powder such as RootGrow to the bottom of the planting hole before inserting the young plant and watering it well at the base. I cover new plants with a grow tunnel for at least a fortnight, you might prefer a cloche or cold frame.
Watering, feeding and guiding the new pumpkin vine
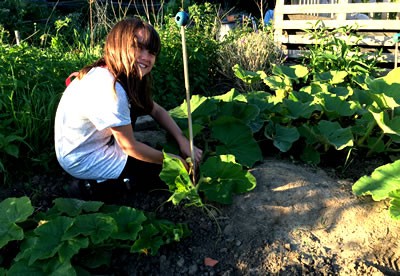 Pumpkins are thirsty plants, initially they don’t need too much water but the bigger they grow the more they need. Always water the base of the plant and not the leaves (unless foliar feeding later). As well as daily watering, I feed my early pumpkin vines twice a week with a nettle tea / liquid fertiliser to give them a nitrogen boost. This continues for around a month as the vine lengthens. If you see flowers on your plant before the primary vine has reached 3 metres in length you should remove them. We don’t want the plant to set fruit until it has put on enough leaves to support a giant pumpkin. Using sticks it is possible to gently divert a vine in a particular direction if it seems to be heading off to your neighbours compost heap (see picture)!
[hr gap=”10″]
Burying the vine and mulching
 The main vine will start to send off secondary vines at various points. These vines also provide an opportunity to increase leaf coverage but don’t let the vines become too long as we do eventually want the plant to divert its energies to a single giant pumpkin fruit (cut the ends off secondary vines and bury them at around 6-8 feet long).
At the junction of secondary vines it is useful to bury the vine so that it can more easily root at those locations in addition to the main plant base. You will know when you have found such a location because a small white bump/node appears beneath. More roots also means more goodness for the giant pumpkin fruit. This technique is over 1000 years old – see my pumpkin growing translation from the Ruralia Commoda.
Remember to water each additional rooting location as the plant develops and do mulch around these points as well as the base of the plant. I recommend a marker at each rooting point because later on it’s difficult to locate all of the watering spots. If a plant dries out it won’t be as healthy, fruit won’t grow as quickly and the plant can be more susceptible to powdery mildew.
[hr gap=”10″]Hand Pollinating
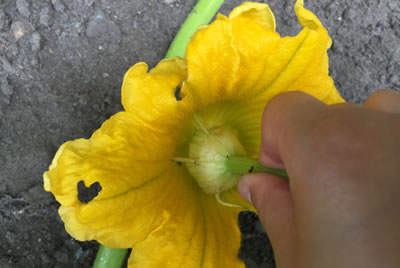 Once your giant pumpkin plant is well establish with a 3 metre primary vine and buried secondaries you are ready to allow a fruit to set. The female flowers have a small ball beneath them (the pumpkin), the male flowers (which usually come out in number first) look like regular flowers. You can leave it to the bees to pollinate your fruit but if you want to be certain of the seed genetics you should check your plant each morning for open female flowers. Once open, snap off a male flower and insert it into the female flower, giving it a gentle twist to pollinate the centre. Female flowers are only viable for around half a day, so don’t miss the opportunity. I usually pollinate with a couple of male flowers and leave one of them inside the female plant.
Fruit feeding & foliar feeding
If you’re lucky enough to have a pumpkin set, give it a week or so and then change your liquid fertiliser feed from nettles to something slightly higher in potassium, potentially comfrey and a banana skin liquid feed or perhaps just some good old Vitax Q4. At the same time I also begin weekly foliar feeds of Seaweed using LIQUISEA via watering can and sprayed directly onto the leaves. I have written a separate article detailing the many benefits of seaweed. I recommend foliar feeding during an overcast day and not an evening, it is not advisable to have damp leaves overnight as this increases the risk of powdery mildew developing and it makes it easier for slugs to damage plants.
[hr gap=”10″]Losing / Shedding Pumpkins
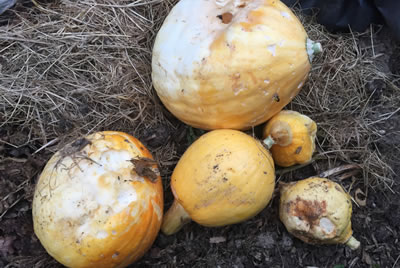 Sometimes a pumpkin fruit seems to set and then perhaps a week or two later you find the plant has decided to stop supporting it. I usually find this coincides with a change in the weather – a cold spell with low sunlight will do it. This occurred in 2016 (see picture) but the plants went on to reflower and grow new sizeable pumpkins (although I was rather worried for a while). In 2017 we had a dismal summer and I couldn’t get a single giant pumpkin fruit to last longer than 3 weeks – they would give me hope and then start weeping pumpkin juice from small holes in their surface before rotting.
Mildew and Pests
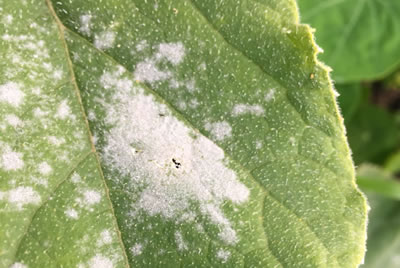 Eventually as a plant nears the end of its 120 day cycle it becomes more susceptible to mildew. At that stage its not really worth losing too much sleep over if you have done your very best to water, mulch and foliar feed. I often cut away leaves that are particularly covered if only to slow down its spread across the plant if a fruit still shows signs of gaining weight. You might also like to try spraying with milk – see here.
Aphids can be a problem solved with an application of washing up liquid water (which suffocates them). Slugs and snails can be distracted by planting nasturtiums among your pumpkin plants. Orange nasturtiums also give something of a natural camouflage to fruit – useful if you are worried about thieves stealing fruit from you.
[hr gap=”10″]Protecting fruit from sunlight
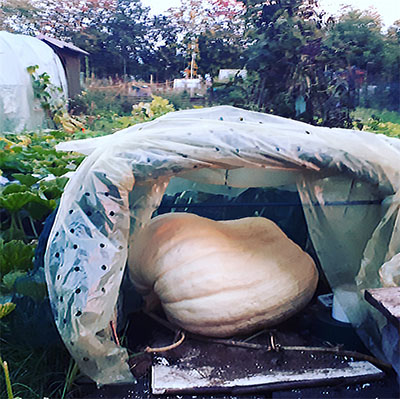 Shading a pumpkin fruit from sunlight keeps it cool and slows down the ripening process – which keeps it growing larger. As a pumpkin fruit grows this may mean a small table has to be placed over it with a drape, or even the construction of a custom frame. I bought a shop floor model greenhouse from the garden centre for £1 in the January sales and that has been brilliant. It also helps to obscure its growth from prying eyes to cover with green netting. However, initially I find an old tunnel hoop covered with a coloured carrier bag is a good cheap solution.
[hr gap=”10″]
When to Harvest Giant Pumpkins

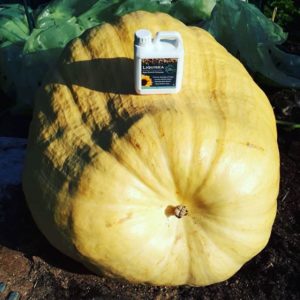
Harvesting is a tough call – there are potential threats out there, rats, thieves, cold weather etc. Generally the colour of the pumpkin is a good indicator – an all over orange and thick skin which cannot be dented with a finger nail are the signs I usually go by. Unless I’m growing from a ‘super seed’ of course, those typically stay yellow and harvest time is dictated by the date of the pumpkin show!
Remove the pumpkin by severing the main vine on two sides rather than the pumpkin stem (like a ‘T’ shape). This reduces the risk of infection causing the fruit to rot.
If entering a giant pumpkin into a competition, remember that once picked it begins to lose water / weight. In 2015 I picked a small one (50bs) in late August and by October it had declined in weight by 1/3. Better to wait until the last possible moment. Don’t be too surprised if you feel a little sad at harvest time, after 120+ days of caring for your pumpkin baby, life can seem a little empty without all the nurturing and dedication you have become accustomed to!
[hr gap=”10″]If you are growing giant pumpkins this year I wish you luck but don’t forget to be dedicated to the cause which is more than half the battle. Tweet me your giant pumpkin progress throughout the year (@growlikegrandad), I’m always keen to see how others fare.
If you need more inspiration I really recommend this 45 minute programme ‘Lords of the Gourd’ below – the Americans know how to grow giant pumpkins and they really are addicted. This programme will help you feel better about being pumpkin obsessed, you’re not alone.