Close Menu
Grow Like Grandad
  • The Allotment
    • Eating & Recipes
    • Life & Community
    • Pests & Diseases
    • Planning & Digging
    • Soil & Nutrients
    • Sowing & Growing
  • The Garden
    • Design & Planning
    • Pests & Diseases
    • Soil & Nutrients
    • Sowing & Growing
  • Health & Outdoors
  • Inspiration
    • Allotment Fashion Week
    • History
    • Medieval Grow Your Own
    • Volunteering
  • Recent Photos
  • About Matt Peskett
  • Contact Matt
  • Learning
Instagram Bluesky Facebook Threads
Grow Like GrandadGrow Like Grandad
Matt's IMDB Lists
  • The Allotment
    • Eating & Recipes
    • Life & Community
    • Pests & Diseases
    • Planning & Digging
    • Soil & Nutrients
    • Sowing & Growing
  • The Garden
    • Design & Planning
    • Pests & Diseases
    • Soil & Nutrients
    • Sowing & Growing
  • Health & Outdoors
  • Inspiration
    • Allotment Fashion Week
    • History
    • Medieval Grow Your Own
    • Volunteering
  • Recent Photos
Instagram Facebook Bluesky Threads
Grow Like Grandad
Home » How to make a small pallet compost bin
How to make a small pallet compost bin
Design & Planning

How to make a small pallet compost bin

Matt PeskettBy Matt PeskettFebruary 20, 20173 Mins Read
Share
Facebook Twitter LinkedIn

Home made compost is essential for any gardener and making a compost bin from pallets is an absolute doddle, anybody with an allotment or large garden should have one. At the weekend I quickly threw together another small pallet bin behind my greenhouse at home. Here is a quick guide on how to make a pallet compost bin, as you’ll see it’s really not rocket science:

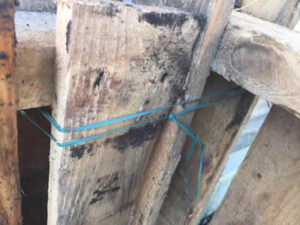
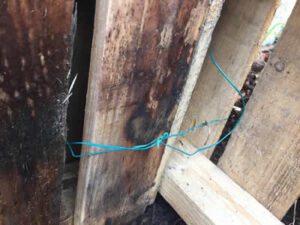
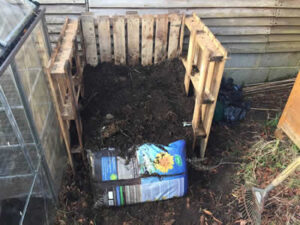
Materials – As a minimum you need  three similarly sized wooden pallets and something to tie them together – I recommend a wire-based plastic coated ‘string’ because it won’t rot. In my local area pallets are very easy to come by at the local tiling centre, otherwise you may find that your local Freecycle group has a few free pallet offers each week. For this latest pallet bin I obtained three matching pallets from a delivery of bricks that I used on a garden landscaping project last Autumn – I’m a bit obsessive so matching pallets ticks my perfectionism boxes!

Location – you should place your new compost bin well away from any of your main growing beds (because it will attract slugs and snails) and ideally somewhere flat. Generally in a garden you’ll want to hide it away from view behind a greenhouse or shed. On an allotment it is possible to use a compost bin as something of a windbreak – I have mine on the North side of my plot, it’s a triple-width pallet bin (9 pallets) and it definitely helps to shield my squash plants from the wind even though it is some distance away from those growing beds.

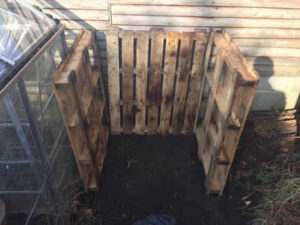
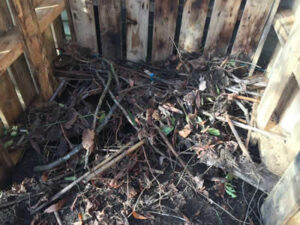
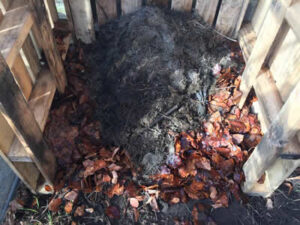
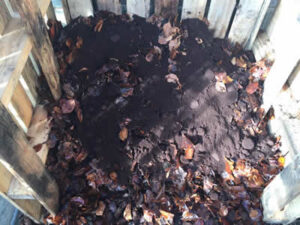
Construction – In the gallery below I have outlined in very simple steps how you go about creating a small pallet compost bin. This is the most basic version, I don’t line my pallets with material because I’ve never found it necessary, not a lot falls out and you need good air circulation. I also don’t bother to stake the pallets using old wooden fence posts; once the bin starts being filled the pallets don’t go anywhere anyway (if tied correctly):

1a) Construction: Place the pallets on end side by side, if your ground is level they will stand unaided for a few minutes while you tie them together.
1b) Construction: Tie the pallets together at the top and bottom corners using the plastic/wire based string.
1c) Construction: Tie the pallets together at the top and bottom corners.
2a) Filling: Place lots of wood and sticks into the bottom of the compost bin. This helps with drainage and air circulation. Some of the soils will still sink through the gaps, this is fine, you want worms to be able to find their way up into the rotting contents.
2b) Filling: Compost Lasagna – Add contents in layers by material type – brown stuff (wood/bark) then green stuff (plant matter). The layering of composting materials aids the decomposition process. NEVER add perennial weeds to a compost heap, they should be dried and burned.
2c) Filling: Coffee Grounds – I add coffee grounds to my compost heap, this is more advisable than adding grounds directly to beds because the caffeine will inhibit plant growth and it can drain out within the compost heap.
3) Holding back the contents – I use whatever I have to hand to retain the compost as the heap grows in size. It is of course possible to add a fourth pallet to the front, tied on only once side to allow access (like a gate).
[hr gap=”20″]

Ongoing Maintenance – On the whole a compost heap won’t need a great deal of attention but there are a few tasks you can undertake to assist the decomposition process and improve your compost:

  1. Add a handful of garden soil with each new layer – it’s full of natural soil bacteria.
  2. Add some layers of animal manure (horse, chicken, rabbit) – all helps.
  3. Water the compost heap from time to time if covered or rainfall is below average (this can include human urine… it’s high in nitrogen).
  4. Equally cover the compost heap in a prolonged wet spell to avoid the nutrients running through.
  5. TURN the pile once every six weeks with a fork.
  6. NEVER add perennial weeds to a compost heap, they should be dried and burned.

An extra tip – Try and grow Comfrey beside your compost bin, the roots will absorb any of the compost bin’s run off nutrients (and there will be some). You can then use the Comfrey leaves to make a Comfrey tea / liquid fertiliser or failing that, at the end of the season just cut back the plants and place them back onto the compost heap to break down. Think of them as a natural compost sponge.

Comfrey is also great for bees!

If you’d like to know more about the detail of the composting process there is an excellent article here from Sharpen Your Spades – Compost: it’s everything – the heart of the allotment garden.

Previous ArticleNew allotment advice & raised beds
Next Article Retaining Walls: Marshalls Croft Stone Walling
Matt Peskett
  • Website
  • Facebook
  • Instagram
  • LinkedIn

Matt is a web publishing and digital marketing consultant who in his free time enjoys allotmenteering and gardening. Horticulture is in the family genes (hence the socials name grow like grandad) and Matt has been growing his own vegetables since he was 7 years old. He also had a mad few years tweeting anonymously as Monty Don's dog Nigel from Gardeners World.

Read Similar Stories

Planting for Pollinators – The RHS Chelsea 2022 Feature Garden

May 13, 2022

Leonardslee Gardens, Loder’s Sussex Jewel Reopened

May 25, 2019

Remembering that allotments are good for the soul

April 5, 2019

growlikegrandad

Chair of #Dorking Allotment Assoc and Westcott Gardeners' Club | Grower of 677lbs pumpkins | 27 yrs in digital | Surviving Hodgkin Lymphoma

Dahlia bed number one cut to bases and manure mulc Dahlia bed number one cut to bases and manure mulched. Will let a bit of rain get in over the next day or two then cover with a plastic sheet for winter. Sandy soil so no need to lift them really.
#dahliaseason
More bulbs potted up. #springbulbs🌷 More bulbs potted up.
#springbulbs🌷
"Oh I do wish the dahlias would stop growing so I "Oh I do wish the dahlias would stop growing so I can get my windowsill back"
#catsofinstagram #dahliaseason
For people who can't find our house, because of a For people who can't find our house, because of a dual access path, MrsGrow has created a pottery solution to hang by the steps.
#potterylife #pumpkingrower
I imagine the planting here looks quite nice in th I imagine the planting here looks quite nice in the summer. Beats me why they cut back the miscanthus already, mine looks gorgeous at home right now, but it's volunteer run. Apparently the contractor who installed it went AWOL. Just waiting to see if I have enough stem cells to collect.
An hour in the sunshine planting up a few more tul An hour in the sunshine planting up a few more tulip and daffodil lasagnes. The only problem with big pots is they need a lot of expensive compost, so I mix in a bit of cheaper stable manure and bottom and top them with the same. Slow going as trowel dependent after last week's hickman line insertion which is still quite sore and stiff.
#springbulbs🌷
We were so pleased to have Justin Griffiths' new S We were so pleased to have Justin Griffiths' new Surrey record pumpkin at Dorking pumpkin show today. Rather glad my one went to #tulleysfarm in September so he couldn't show me up 😂 I did enter some gourds, came second 😂 #giantpumpkins #giantpumpkingrower #pumpkingrowing
Lots of variety at the pumpkin show. Lots of variety at the pumpkin show.
Pleased to see some of my genetics grown by others Pleased to see some of my genetics grown by others. Especially because now I know that line is orange! Both from the same plant.
@markgoodchild71 apparently these are going in my front garden? 😂
Monty for company. Waiting to have a hickman line Monty for company. Waiting to have a hickman line put into my chest for next week's stem cell collection.
Follow on Instagram
GrowLikeGrandad © 2025. All Rights Reserved | Also see Vertical Farming Today and Farm Automation Today

Type above and press Enter to search. Press Esc to cancel.